
Quickstart Guide for the Dead of Night
WalkthroughWhat is the Game?
Connecting to the Game
Creating a Character
Information about Yourself
Handling Equipment
Getting, Discarding, and Looting Equipment
Moving Around
Fighting and Getting Experience
When you Die...
Places to Level and The City of Pangaea
Leveling Up
Hunger and Thirst
Healing and Regenerating
Using Shops
Talking and Socializing
Exploring
More Help
Walkthrough
[skip to next section] [back to contents]This guide will cover the basics for playing the Dead of Night. During the game you can type help followed by a command or topic to find information. If you want to get into the game without too much reading, a walkthrough of the first few levels is available by clicking the link below.
To the WalkthroughWhat is the game?
[skip to next section] [back to contents]The Dead of Night is a MUD, or text based internet game for multiple users. You play at the same time and in the same space as other people all over the world, gaining levels, doing quests, exploring, and roleplaying. There is no cost to play the game, and you can play as long as you like.
Connecting to the Game
[skip to next section] [back to contents]Most new players connect to the game using windows telnet. This is done by going to the start menu, selecting Run, and entering telnet deadofnight.org 5000. However, that is not the best option because you aren't able to see what you're typing, the font is difficult to read, and there are many better alternatives available in the form of specially designed MUD clients.
The game can also be played with AIM, GoogleChat or another Instant Messenger that connects with jabber. The username to add to your instant messenger program are don.mud@jwchat.org or don.mud@jabber.org. This is useful as you can often bypass firewalls at school or university. However, the game doesn't look as good, so go with another option when you can. If you do use this option type in set brief on and set nohangprompt on, this will help make things less confusing.
Many MUD clients add color, display everything nicely, and reduce the amount of typing you need to do when you play the game. One free client that you can use is DoN client. It requires some .net libraries to be downloaded and installed (also available at http://deadofnight.org/?x=donclient).
But you don't really need a MUD client when you are first starting to play the game, and it may take a while to familiarize yourself with all of the options available in a MUD client. Any program that can make a telnet connection can be used to play the game. Putty is a recommended client and can be downloaded at http://www.putty.nl/latest/x86/putty.exe. Just type deadofnight.org under the "Host Name (or IP address)," and 5000 for the "Port," then click open. If you're using unix then simply typing telnet deadofnight.org 5000 works.
If you must use windows telnet, while running the telnet program type ctrl+], set localecho, and then press enter until you get back to the MUD. This will allow you to see what you're typing.
Creating a Character
[skip to next section] [back to contents]| Command | Short | Example | Description |
| class | clas | class warrior cleric | Can only be used when creating a character. If you choose an invalid class it will give a list of classes you can pick from. |
| race | rac | race dwarf | Can only be used when creating a character. If you choose an invalid race it will give a list of races you can pick from. |
| sex | sex | sex male | Can only be used when creating a character. |
When you first log in you'll be presented with a picture of a castle and be asked for a name. If you already have a character, just type in the name and the password to continue playing that character. Otherwise try some names until it says you're making a new character.
Sometimes the name you try is not allowed because a monster or another player is using the name already. The game also disallows numbers or symbols from being used in the name.
You will then be allowed choose the Race, Classes and Sex of your character. The gender of the character doesn't make much of a difference. Different races have various bonuses and weaknesses, which can be looked up here. When choosing a class, you have the option of selecting more than one (multiclass), for example class warrior cleric. Choosing two or three classes provides you with a broader breadth of skills without sacrificing too much depth. A fun part of the game can be deciding how to combine race bonuses with classes to make stronger or more interesting characters. Choosing the race vampire for your first character is probably a bad idea because vampires need to learn how to hide from the sun. When you have made all of your race, class, and gender selections, type done.
Information about Yourself
[skip to next section] [back to contents]| Command | Short | Example | Description |
| set | set | set color on | Allows you to change various settings you can have for your character. |
| report | rep | rep | You say your hitpoints, mana and movement out loud. |
| score | sc | sc | Shows the more important information about your character. |
| attribute | att | att | Shows additional information about your character as you gain up to a certain level. |
Type set color on, now type set display on. Setting display on shows you some numbers "H:48 M:108 V:112 >." H stands for hitpoints, M stands for mana, V stands for movement. Now, type report to see your stats. This should match the numbers you saw earlier.
To find more info about yourself in score, type sc. Most importantly, it tells you the experience you have gained and how much is needed for the next level. Also, att will give you info about your character; however, you need to gain a few levels before you will be able to see all the information that is available.
Handling Equipment
[skip to next section] [back to contents]| Command | Short | Example | Description |
| inventory | i | i | Shows the items you are carrying in your inventory. |
| equipment | eq | eq | Shows the items you wearing. |
| wear | wea | wear all | Takes items in your inventory and equips them. |
| remove | rem | remove shield | Removes items that you are wearing and puts them into your inventory. |
| wield | wi | wield hammer | Takes a weapon in your inventory and equips it as your main weapon. You can use wear instead of this. |
| hold | ho | hold shield | Takes a shield, small weapon, or miscellaneous item and equips it on your offhand. You can use wear instead of this. |
| keywords | ke | key | Gives a list of items and monsters in the room you are in. It shows all the names that can used to interact with them. |
Inventory, i, will show you what items you are carrying, while equipment, eq, will show you what items are wearing. Gold is stored separate from equipment, and you can view how much gold you have using score.
The easiest way to wear all of your equipment is to type wear all. To wear one piece of equipment, type wear followed by the item's name. If you have several items with the same name, you can type the two names of the item separated by a dash, eg: wear shield-small or you can type a number for where the item is in your inventory eg: wear 2.shield to wear the second shield in your inventory. If an item can be worn in more than one place as is the case with magic stones, you can follow the item name with an equipment slot, such as wear stone offhand or wear stone hover. The slots of items you are wearing can be found when you type eq.
If you're having trouble finding the names of items in your inventory, you can drop everything on the ground and type keyword and that will show you all the names of the items.
Sometimes equipment you are wearing stops you from wearing something else. To remove all your equipment you can type remove all. Remove works similar to wear for removing equipment, however you can also remove any item from an equipment slot by typing remove followed by the slot number seen in eq. Slot 17 is offhand so remove 17 might remove a shield that you were using.
Wield and hold are two commands that work like wear, except that they only work for the onhand and offhand equipment slots. Instead of typing wear stone offhand you can type hold stone.
Getting Discarding and Looting Equipment
[skip to next section] [back to contents]| Command | Short | Example | Description |
| get | ge | get gold corpse | Allows you to get items from the ground, from slain enemies or containers. |
| put | put | put shield bag | Allows you to store items in a container. |
| drop | dro | drop old-sword | Puts things on the ground by dropping them. |
| keywords | ke | key | Gives a list of items and monsters in the room you are in. It shows all the names that can used to interact with them. |
| junk | j | junk old-sword | Junking an item will permanently get rid of it. It is used for trash that you no longer need. |
| empty | emp | empty bag | The empty command is useful for getting items out of containers or corpses without the hassle of having to pick them up. It drops the items on to the floor. |
To get items on the ground you can type get item. If you're lazy you can type get all to get everything that you are able to. If you feel too puny to use an item, it is because you need to be a higher level before you can pick it up. If you can't figure out what the name of the item is, use keywords, key, to show you. To get the second shield in a room, you can type get 2.shield. To get an item out of a container you can, for example, type get shield bag.
You can take the loot from monsters you have killed by typing get all corpse. Typing look in corpse, will tell you what loot the monster has.
To store an item in a container such as a bag or backpack, you can type put item bag. You can do all the same things for picking out your items as before such as put 3.shield-small bag, which puts the third small shield into the bag. Or put all.shield bag which moves all shields in your inventory into the bag.
Drop and junk are ways to get rid of items. Drop puts them on the floor, while junk throws them away for good. You can specify which items to drop or junk the same way you would for get and put.
Empty is used for getting all the items from a container onto the floor. It is useful when you want to look at an item but are too puny to pick it up, or you cannot carry anymore items due to your inventory being full.
Moving Around
[skip to next section] [back to contents]| Command | Short | Example | Description |
| look | l | l in bag | Typing look by itself will look at the room and show the description and exits. You can look at people or monster to find out more information, also you can look inside containers by typing l in followed by container name. |
| scan | sca | scan north | Scan is used for looking around to see if any monsters or people are nearby. If you type scan you will look in all directions. If you type scan followed by direction you will search in only that direction. |
| exits | ex | exit | Exits show you the directions you can move and the names of locations in those directions. |
| north | n | n | Go north one room. |
| south | s | s | Go south one room. |
| east | e | e | Go east one room. |
| west | w | w | Go west one room. |
| up | u | u | Go up one room. |
| down | d | d | Go down one room. |
| stand | st | stand | If you see the message "Nah...You feel too relaxed to do that." that means you're sitting down and need to type stand. |
The MUD is made up of many different rooms, which are places that your character can be. Typing l for look shows you the room description, any monsters or players in it, any items on the ground, and any exits. You can type exits to see the names of nearby rooms which helps if you're not sure where you are.
Scan, sca, can be used to see monsters in nearby rooms, and you can also scan in a specific direction, for example scan north.
After deciding which direction you want to move in, you can use the commands n, s, e, w, u, and d to actually move in that direction.
After resting or if you are knocked down during combat, you will find yourself on the ground. If you see the message "Nah...You feel too relaxed to do that," that means you're sitting down and need to type stand before you can move around again.
If you get a message saying that you are exhausted, you have run out of movement. You should make sure that you're not hungry or thirsty and rest to get some movement back.
Fighting and Getting Experience
[skip to next section] [back to contents]| Command | Short | Example | Description |
| consider | con | con merchant | Find out how a monster compares to you. Useful when deciding if it's worth attacking something. |
| kill | kill | kill monster | Attacks a character or monster. |
| hit | hit | hit merchant | Attacks a character or monster. |
| flee | fle | flee | Attempts to escape combat in a random direction. If you can't escape in that random direction, for example, if there's no exit there, you fail to escape. |
| keywords | ke | key | Gives a list of items and creatures in the same room as you. Useful for finding out which monster to kill. |
If you want to gain levels and move up in the world, you will need to be able to fight and gain experience.
The first step is to ensure that all of your equipment is in place. See the previous section for instructions on handling equipment. You can use wear all to ensure that you're wearing everything you can. Good armor will help reduce the damage done to you, especially if you have a good shield which will help deflect blows. Using weapons is usually much more effective than hitting with your bare hands.
The next task is to locate the monsters you want to kill. If you are in the newbie training area, there are some monsters on one of the higher floors. Otherwise, you can go to the Places to Level and The City of Pangaea part of the guide. Use scan to see monsters from a distance. Once you have located the monsters you want to kill, you can consider, con, them to find out how easily you can kill them. Use keywords to find out the names of monsters if you're having trouble with that.
Before you start the battle, type set wimpy on and set flee 1000, which will cause you to automatically flee when your current hitpoints drop below a third of your maximum hitpoints.
To attack monsters you can use hit or kill followed by the monster name. If the battle goes badly you can type flee to try to escape.
Whenever you kill a monster, you should get some experience. When you type score you will see that the exp you have scored has increased, while the experience points until next level has decreased. Note that the experience needed for the next level doesn't stop at zero, but goes negative when you are able to gain a level.
To check for useful equipment on the bodies of your slain foes, type look in corpse. You don't need to do that all the time; just type get all corpse to get everything from it without bothering to look.
When you Die...
[skip to next section] [back to contents]When you die, your body with all your equipment and money gets left on the ground, and you get sent back to the Portal of Creation where you first started the game. When you are below level 5, you will not lose any levels; however, when you are a higher level and more familiar with the game you will start losing a level and experience when you die.
When you find yourself in the Portal of Creation, the first thing you need to do is stand up so you will be able to move again. Hopefully, you can find your back to where you died.
Once you get back to where you died, you can type get all corpse to get all of the items out of your corpse. If there are more corpses in the room than just yours, you can get all followed by your name. If you died multiple times in a short space of time, you will have multiple corpses. You need to find the corpse that resulted when you died and had your equipment. If you are a vampire, you leave dust instead of a corpse. When you find your dust, typing get all dust works. Again, you can use get all followed by your player name to get your equipment back.
Remember to wear all and then get all from your corpse again, as sometimes you are carrying too many items in you inventory to pick everything up without wearing some things first.
If the place you died is dark, that can stop you from finding your corpse. You may need to a lantern or a ball of light so that you can see, but the lantern or ball of light doesn't work when in your inventory, so you may need to either wear it, wear lantern wear ball, or you can drop the lantern or ball of light in the room you are in to illuminate it.
Another problem is if the corpse is no longer at the place where you died. If you waited too long, the corpse may have dissolved and the items will be left behind on the ground where monsters can pick the items up. Another possibility is that a monster may have eaten your corpse, causing all your items to be left on the ground. A third possibility is that a janitor found your corpse and picked it up, in which case you can get your corpse back by killing the janitor and emptying the corpse of the janitor empty janitor.
Don't be afraid to ask for help if you're having trouble getting your equipment back; there is a good chance that someone will be able to help you, if you make them aware of your problem.
If all else fails and you don't find your equipment, it's not the end of the world. Especially in the lower levels, it is fairly easy to pick up more equipment around town. Higher level players are often willing to help, if you are polite, and you'll likely find that they are able to replace much of what you lost.
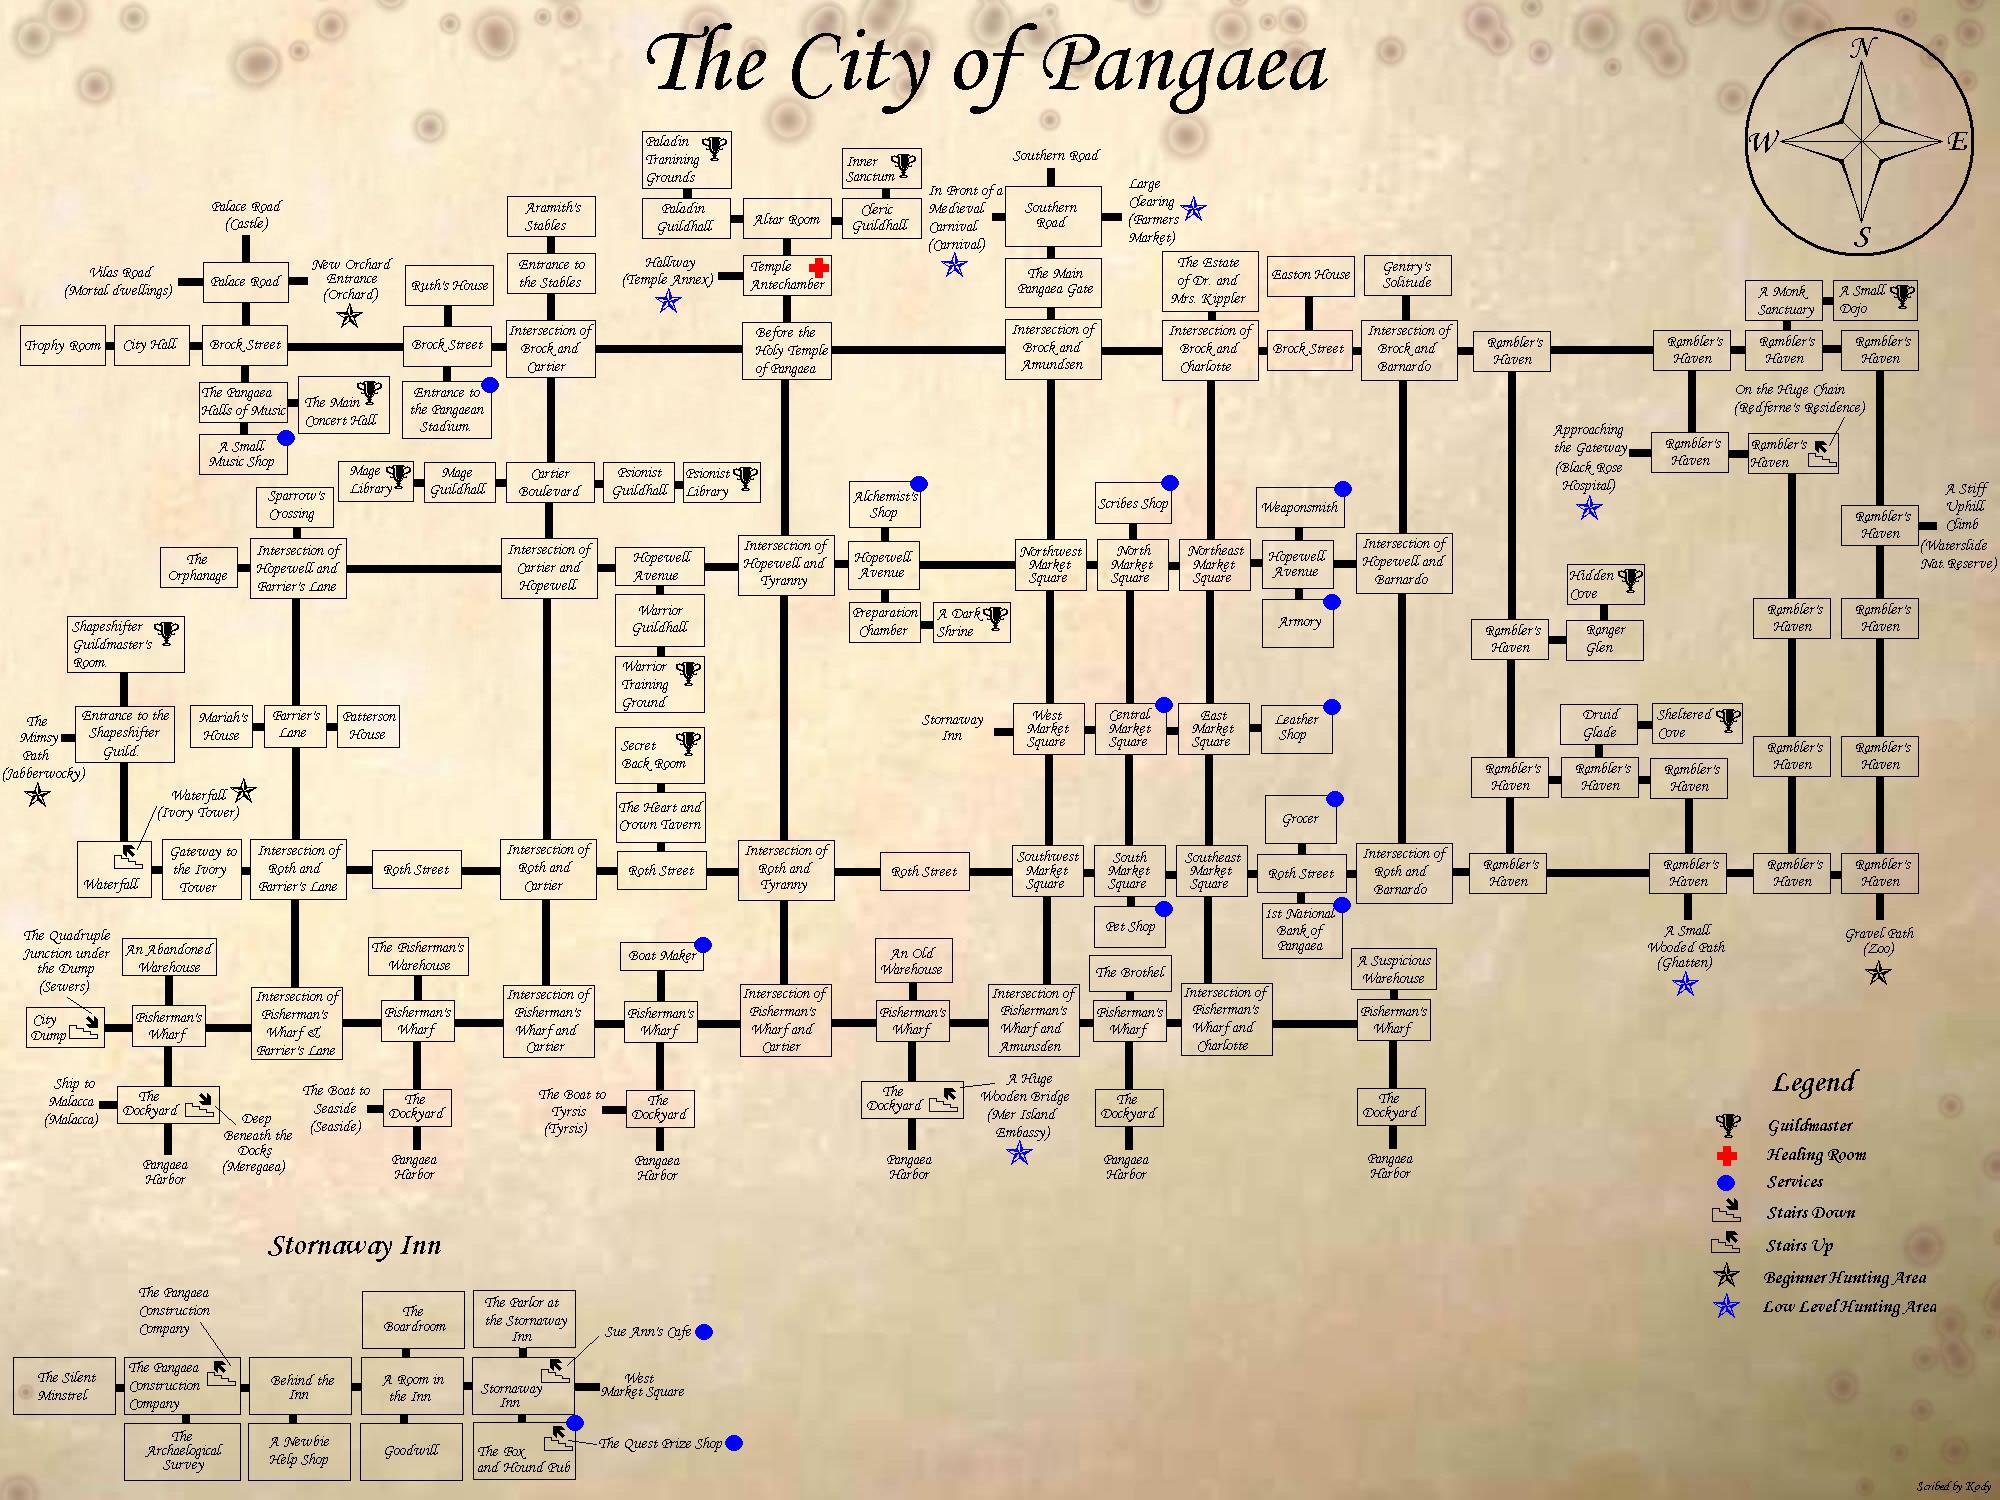
Places to Level and the City of Pangaea
[skip to next section] [back to contents]http://www.deadofnight.org/images/pangaea.jpg
The map in the link above shows the layout of the City of Pangaea, which is a small part of a much much larger world for you to explore. When starting out, you won't need to stray very far from the city.
The various boxes on the map show rooms in the world, with black lines showing north, south, east and west exits for each room. Up and down are shown with stair symbols in the room. At the edges of the map, the name of the room an exit leads to is shown with the adjacent zone or area name in brackets.
The city map is marked with various symbols to show places of importance. The blue dots show services like the bank, arena, fountain and shops. The red cross near the top of the map marks a hospital room where many people socialize and go to take advantage of its accelerated healing effects.
The black stars on the edges of the map designate the entrances to relatively safe hunting places that are recommended for levels 1 to 10. The blue stars signify slightly higher level and more dangerous places that are recommended for levels 10 to 20.
Guilds are marked with the cup symbol. These are places where characters can gain levels and learn new skills when they have enough experience. Which of the guilds you need to visit depends on the classes you have chosen. Most of these are fairly obvious from the room name or the name of the room that leads there, although the room "A Dark Shrine" for the blackguards and the "Secret Back Room" for thieves can be hard to figure out. The guilds in town can only train you from levels 1 to 10. Later on, higher level guild masters need to be found.
Leveling Up
[skip to next section] [back to contents]| Command | Short | Example | Description |
| gain | gai | gain | Can only be used at a guildmaster of one of your chosen classes when you have gained enough experience to level. |
| prac | pra | prac warrior | When used at a guildmaster of one of your classes, it allows you to learn or list available skills. When used elsewhere, it can show you a list of the skills and spells of any class. |
Once you have gotten enough experience to gain, you can go to your guild and gain a level by typing gain. This can give you various bonuses to hitpoints, mana, and movement, plus some practice sessions with your guildmaster. You can only gain a level in a class at the guildmaster for that class.
Afer you have gained a level you can practice any new skills the level gives you by typing prac. If you are at your guildmaster, this will give a list of skills for that particular class that you can learn or have already learned. You will earn a limited number of practice sessions with your guildmaster, each time you gain a level. With these sessions, you first learn the skill and then improve your ability in the skill. To practice a skill type prac followed by the skill name, eg: prac armor.
If you are not at your guildmaster, typing prac followed by a class, eg: prac warrior, will give you a listing of all skills and spells that are available to that class. You can use this command to view the skills and spells for any class, even if it is not one that you are studying.
Hunger and Thirst
[skip to next section] [back to contents]| Command | Short | Example | Description |
| drink | dri | drink water | To stop thirst, you drink something. |
| eat | eat | eat bread | To stop hunger, you eat something. |
Hunger and thirst will not hurt you or weaken you in battle. What they will do is slow down the regeneration of hitpoints, mana and movement. You can eat bread and drink cup to take care of the problem; however, the fountains you see around the game take care of both hunger and thirst if you drink from them. There should be a fountain in Central Market where you first entered the city. If you drink twice from the fountain every time you pass by, hunger and thirst shouldn't be a big problem, and you won't need to worry too much about carrying food and water with you as you adventure.
Healing and Regenerating
[skip to next section] [back to contents]| Command | Short | Example | Description |
| rest | re | rest | You sit and increase hitpoints, mana and movement regeneration. |
| sleep | sl | sleep | You sleep and increase hitpoints, mana and movement regeneration. |
| stand | st | stand | After resting, sitting or sleeping, you need to stand up to move around or to perform some other actions like casting spells. |
| wake | wa | wake | After sleeping you need to wake up then stand to move around again and do various things. |
The Temple Antechamber, shown on the map with a red cross, is a healing room. Hitpoints, mana and movement all regenerate at 4 times the normal rate, healing rooms, so after a tough battle, when you're low on hitpoints, mana and movement, it may be a good idea to come to the Temple Antechamber. To regenerate faster you should make sure you drank from the fountain recently to be certain you are not hungry or thirsty.
Typing rest will help with regeneration, and typing sleep will help you regenerate even faster, although you lose the ability to see what is happening around you and to talk to people when asleep.
If you go to sleep, you need to type wake to wake up again, and then stand to get on your feet again. If you see the message "Nah...You feel too relaxed to do that." that means you're sitting down and need to type stand. When you're just resting you just need to stand, if you want to do something.
Using Shops
[skip to next section] [back to contents]| Command | Short | Example | Description |
| list | li | list | This command can only be used at a shop. It shows the items being sold at the shop and information on their prices and required level to use. |
| buy | bu | buy potion-healing | This command can only be used at a shop. It allows you to buy items. |
| sell | se | sell potion-healing | This command can only be used at a shop. It allows you to sell items. |
| value | va | value potion-healing | This command can only be used at a shop. The shopkeeper will tell you how much you will be paid for the item. |
Shops are useful for buying and selling useful items. You can see what a shop is selling by typing list. Shopkeepers will not buy everything that you have, as they often trade in certain kinds of items. How much money you would get from selling the item can be found out by typing value. If shopkeepers complain about not being able to see you, this is because you need to remove any invisibility by typing vis or because the room is too dark for them to see you.
Talking and Socializing
[skip to next section] [back to contents]| Command | Short | Example | Description |
| who | wh | who | Shows a list of players that aren't hidden from you. |
| tell | te | tell jean Hello | Sends a private message to a single player. |
| say | ' | 'Hi there | Says something that only people in the room can hear. |
| ooc | oo | ooc Hello Everybody | Talks to everyone in the game as yourself, rather than as your character. |
| rumor | rum | rumor Slay the Undead! | Talks to everyone in the game as if your character is speaking. |
| auction | au | auction Selling Armor | Announces to everyone your intentions to buy or sell equipment in the game. |
| newbie | newb | newbie Where's the Tower? | Talks on the new player help channel. Only new players and people that offer to help new players can use this channel. |
Talking to other people is a big part of the game, and there are several ways to do it. First, type who to see if many people are around. If you see more than 5 people, there's a very good chance that someone isn't busy and will talk with you. When there are few people on, don't be disappointed if nobody replies, as the people around may be on a quest or busy hunting monsters.
You can talk on the gossip channel by typing ooc followed by the message you want to write, for example ooc hello. The ooc channel is used for general purpose off topic talk. Channels like ooc are seen by almost everyone in the game, and two of the other important channels are rumor, which is used for roleplaying, and auction, which is used for buying and selling equipment.
If you're in the same room as another character (type look to see if there is anyone in the room with you), you can type say followed by the message. For example say hello. If the person you're talking to isn't on the who list, it may actually be a non-player, computer-generated person. Also remember that if the person you're speaking to is asleep, they won't see anything you're saying. Also, a person may be (AFK) which means that they are not at their computer.
Finally there is tell, which is a way to talk to just one person. The difficulty, sometimes, is finding out the name of the person you want to talk to. If someone recently spoke to you using tell, then you can reply to them by typing reply followed by message. Again, try not to get frustrated if people don't reply; this is a game, after all, and people don't watch their computers all of the time.
For more info, type help channels, help socials, help tell, or ask a few people about socializing and roleplaying. You can also use the newbie channel to ask questions about the various channels.
Exploring
[skip to next section] [back to contents]| Command | Short | Example | Description |
| time | ti | time | Shows the time of day in the game. |
| recite | rec | recite recall | Use a scroll to cast a spell. |
You have the map of the main city, but the game is very big, with new places to explore being added all the time. In fact, even the best and oldest players haven't been to all the places in the game.
Try to get a "helm of sight" and "boots of levitation" as these will help you with exploring and getting around. Without a helm of sight you will sometimes find that you have entered a dark room in which you cannot see anything. This is most likely to happen at night. You can use a lantern, which will help to light up a room if you hold it (hold lantern) or drop (drop lantern) it on the ground.
If a certain room you're about to enter may be dangerous, type exits and scan, and that will give extra info on the nearby rooms.
Certain places are more dangerous than others, so try to rest in the temple with its bonus to healing. Resting in the temple can also help you get to know the other players, since many players come to the temple to regenerate and you can talk to them about where the best places to hunt are and what equipment to get.
Between the hours of 8pm and 5am corpses of dead monsters will rise as undead. These can be dangerous as they are aggressive towards the living, and several together can do serious damage. Fortunately, the undead will not rise in certain places, so if you find the undead difficult to combat, you can spend the night in civilized places, like town, that are protected.
When you have enough money, you can start buying recall scrolls at the scribe. These allow you to instantly teleport back to the local inn by typing recite and the scroll name, in this case recite recall. This is useful if you get lost or want to escape from danger.
For a general idea of the layout of the world and the territory available for exploration, please visit the Maps page, for some maps of the known continents.
More Help
[back to contents]| Command | Short | Example | Description |
| read | rea | read | Allows you to read books or brochures. |
| help | he | help | Shows help topics on just about all the spells, skills and subjects in the game. |
There are still many details about the game that are not covered in this quick start guide. For more information, you can use help followed by the subject matter, for example help potion, or read the newbie brochure in your inventory by typing read brochure. You can also use the channels ooc or newbie to ask questions.
To the top
